 CHRONAR MECO NINETEEN 90 RALLY COMPUTER
Users Manual
CHRONAR MECO NINETEEN 90 RALLY COMPUTER
Users Manual
Congratulations! You have purchased one of the finest rally computers made. A complete understanding of the Nineteen 90's features will help you enjoy your rallying and your computer. Read this manual thoroughly before installing or using the Nineteen 90. An hour's reading will pay off handsomely. A practice session (possibly rerunning an old rally) will also be useful before using the Chronar in competition.
Do not connect the impulse unit until instructed to so!
If the Nineteen 90's case is opened for any reason, take care not to allow any static electricity to discharge to the electronic "chips". Keep your fingers off the "bugs"!
The following steps for the installation of the Chronar Nineteen 90 will satisfy most cars. Any questions can be answered by contacting Chronar or your dealer.
The cable impulse unit may be installed in the odometer cable line at any accessible connection such as:
Between Speedometer and cable: If required, a 6" or 12" cable extension can be ordered to gain better access under the dash. Be careful not to put any tight bends in the odometer cable. Make sure the fittings are tight.
Between the EGR control box and cable (under hood): Be careful not to put any tight bends in the cable.
Installation at the transmission end of the odometer cable is possible in most cases but is not recommended unless protected from rocks and other road hazards.
At the end of an auxiliary drive cable from a hubcap drive or other 1:1 "L" or "T" gear. Do not mount on the output of a 8:1 Halda "T" gear. An impulse unit is available on special order for use with an 8:1 gear. (See Cable Drive Detail.)
The square pin supplied goes between the speedometer and the impulse unit. Minor bounce of the speedometer needle at slow speeds is normal. If there is excessive noise or bounce, the cable might be binding on a sharp bend or the impulse unit might not be tightened down or might be cross-threaded.
When changing makes of cars, the ends of the sending unit may be switched to match your new speedometer fittings. These are standard Halda fittings. Contact Chronar or your dealer.
The Chronar impulse unit contains a small hall-effect device that normally requires no maintenance. A light coat of grease or silicone lube may be applied to the rotor shaft, if you wish.
If the impulse unit is taken apart for any reason, make sure the small shim(s) are replaced properly. These keep the magnets in place under the sensor. Also, the longer end of the rotor inside the impulse unit normally goes towards the male (cable) end of the housing rather than the female (speedometer) end. (See Cable Drive Detail.)
The magnetic impulse unit is built into a stainless steel rod, threaded (3/8 - 24) to ease installation.
There are many possibilities for mounting the magnets and impulse unit. They are normally installed on an un-driven wheel. The magnets may be mounted on the brake drum with the impulse unit through the backing plate or may be mounted on the wheel rim with the impulse unit hung off the brake rotor or even the Macpherson strut tube. The Magnet Installation Detail will give you some ideas. Obviously, the impulse unit must move with the suspension so that it stays a constant distance away from the magnets.
The only necessities are that the magnets be mounted as a pair at opposite sides of the wheel so that they both pass under the impulse unit during each wheel revolution; the dots painted on the magnets must face the impulse unit; and the impulse unit must be close enough to the magnets to record the passage.
Be sure to loop the cable to allow for suspension movement. Following the brake line usually works well.
If the magnets are mounted on the wheel rim, be sure to mount two more on the spare! Balancing the wheels after the magnets are mounted can be tricky and in most cases not necessary. If the wheels are spin balanced, be sure to warn the garage of the magnets, they could fly off. Tire changing machines are also murder on magnets.
There are several types of magnets available from your dealer or from Chronar to meet specific installation needs.
| Type A | Type B | Type C | Type D | Type Z | |
| Shape | Round | Round | Rectangle | Round | Rectangle |
| Diameter | 0.5" | 0.7" | 0.5" | ||
| Depth | 0.2" | 0.25" | 0.235" | 0.24" | 0.375" |
| Length | 1.175" | 1.43" | |||
| Width | 0.355" | 0.28" | |||
| Typical Gap | 11/64" | 1/4" | 1/4" | 11/64" | 9/32" |
| Intended Use | hub | wheel/hub | wheel | hub/hot* | wheel |
*The Type D magnet is especially suited for locations that will be subject to high temperatures such as inside brake drums. (See Magnet Installation Detail.)
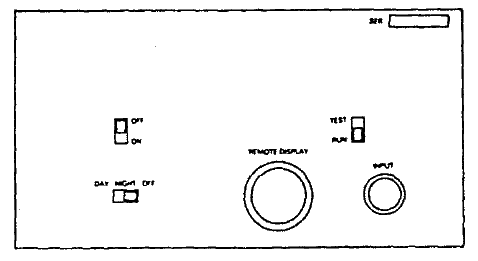
| Power switch | OFF |
| Display switch | DAY (NORMAL) |
| Test/Run switch | RUN |
*Actually the computer is internally protected against power reversals, but may need to be returned to Chronar for repair.
The installation is now complete.
| Power ON/OFF | Supplies power to computer. |
| DAY/NIGHT/OFF | Adjusts brightness of displays on computer and driver readout. This can be turned OFF without affecting memory or operations to save the car's battery (rarely needed) and to give the displays security from prying eyes. |
| TEST/RUN | The TEST position provides internal impulses (at 60 mph with factor at 5000 - distance pulses and computed time pulses are produced at the same rate) for showing off and for experimenting. RUN is the normal position. |
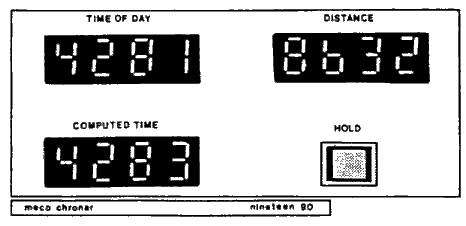
| TIME OF DAY | Minutes and hundredths from 00.00 to 59.99, then repeating. |
| DISTANCE | DISTANCE from 00.00 to 99.99, then repeating. Note that this may be miles or kilometers. All distances referred to in this manual are miles. These distances may just as easily be kilometers by changing the correction factor (multiply by 1.6103). |
| COMPUTED TIME | The calculated time-of-day from 00.00 to 59,99, then repeating. This is computed using the distance traveled and the speed set in the speed banks. |
| HOLD Button | This button freezes the displays on the front panel (showing all the decimal points as a warning). Useful at checkpoints. Note that the Driver Display and all internal functions continue to operate normally. Press HOLD again to return the displays to current. When in HOLD, all decimal points in main computer light up to advise the navigator of that condition. |
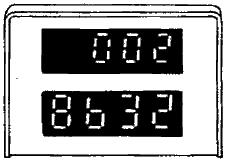
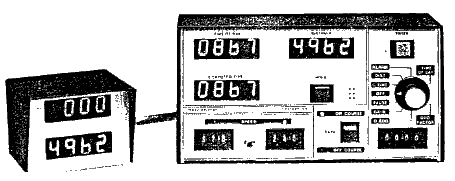
There are 2 displays in the unit placed in front of the driver: The "Null" Readout and a second Distance display that shows the same as the one on the Front Panel.
The "Null" Readout shows the difference between the Time of Day and Computed Time readouts on the front panel. 000 is perfect. 050 means 1/2 minute early. 950 means 1/2 minute late.
The computer will, of course, display 050 at either 0.50 minute early or 10.50 minutes early and will display 950 at either 0.50 minute late or 9.50 minutes early. A quick check of the computer front panel will verify which is the case.
The Chronar computer is set up for digital timing. That is, it is expected that the checkpoint workers will have digital watches that show the time starting precisely at the hundredth. If you are even a millisecond early, the worker's watch will time you as 1 early.
A tip on getting zeros: Run into the control on 999. If this gets you a 1 late - do it on 000.
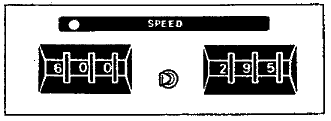
Two 3 digit thumb wheel switch banks control the SPEED used to calculate the computed time-of-day. These hold speeds from 01.0 to 99.9 miles per hour. Speeds of 00.9 mph and less will be ignored. The speed bank to be used (active) is chosen by the toggle switch located between the two banks. The inactive bank may be pre-set with the next speed to use at the next CAST instruction. A red indicator will light up over the active speed bank.
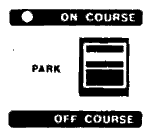
This switch indicates whether to count the Mileage and Computed Time up (ON COURSE) down (OFF COURSE), or not at all (PARK). The ON COURSE position is the norm and a green light will indicate that all is OK.
If you need to retrace an off course excursion to return to the correct course, pick a handy landmark and switch to PARK as you go by. Turn around and switch to OFF COURSE at the same landmark. The Distance and Computed Time will then decrease as you travel (probably quite rapidly) and the Driver Display keeps track. When the correct course is regained switch back to ON COURSE and continue.
PARK can also be used to pull into parking lots, gas stations, or to drive off-course or back up and return. Always pick a prominent landmark at which to restart.
Note that in OFF COURSE, a red light will light up to indicate that all is not right. In PARK, the Distance display flashes - even more eye-catching so leaving the lunch break still in PARK will be prevented (it happens all the time).
Note also that the computer cannot tell if the car is going forward or backing up. It just senses impulses. Whenever you back up, go to PARK or OFF COURSE. When regaining the course (in OFF COURSE) any backing up should be done in PARK or ON COURSE.
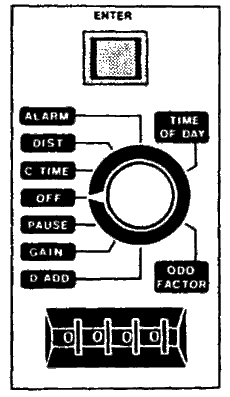
The right side of the front panel contains controls that give the navigator the ability to change the Distance, Time-of-Day, and Computed Time counters and to perform other actions as discussed on the next few pages. There are three components:
| Pre-set switches | a 4 digit thumb wheel switch bank that is set to the amount to be entered (XX.XX). |
| Select Mode dial | a 9 position rotary switch that is used to determine the function. |
| Enter button | a push-button switch to enter the data. |
All actions except D ADD are made through these controls by following the steps below:
All actions except D ADD may be done when moving or stopped. They are done properly regardless of the position of the ON COURSE/ PARK /OFF COURSE switch, the Speed Banks and Control switch. (Note that in some Modes the positions of these switches will determine the outcome of the action).
The Modes and their actions are:
ALARM - Used to Pre-set a mileage point at which an audible alarm is required. When the mileage entered matches the Distance display an audible reminder will sound and will remain on until it is manually silenced by pushing ENTER with the Mode switch set to OFF. When the mileage is entered, it will be displayed for 1/100th minute in the COMPUTED TIME display. There is no provision for peeking at alarm register -- just be assured that it is set -- have we lied to you yet? If the alarm sounds during an off course excursion, it will not sound again as you pass that same point on the way back. The alarm is initialized when the Chronar is turned on to 99.99 miles and will sound at that mileage unless set to another mileage.
DISTANCE - Used to Pre-set the DISTANCE displays (normally at the start of the rally, an outmarker, or other official mileage point).
COMPUTED TIME - Used to Pre-set the COMPUTED TIME display (normally at the start of the rally, an outmarker, or other point where official time is given). Note -- Always enter the true out time at the restart. Don't enter 00.00 unless starting at the top of an hour.
OFF - When ENTER is pressed in the OFF Mode, the Odo Factor will be shown in the DISTANCE display for 1/100th minute and the alarm will be silenced if sounding.
PAUSE - Used to add a specific amount of time to the COMPUTED TIME display and to the Driver's Null display. The pause amount will show in the COMPUTED TIME display for 1/100th minute. The pause is verified by observing the Computed Time and the Driver's Null displays.
GAIN - Used to subtract a specific amount of time from the COMPUTED TIME and from the Driver's Null display.
Note that the PAUSE (and GAIN) functions should be performed at the same point when retracing the route in OFF COURSE. If a PAUSE was entered during the OFF COURSE excursion, a PAUSE must be entered again while retracing the route. The Nineteen 90 will adjust the PAUSE (or GAIN) correctly.
TIME OF DAY - Used to set the computer's clock to the time of day. Set the Preset to the next minute (for example, 59.00 ) in the thumb wheel switches and press ENTER at the WWV/CHU beep.
ODO FACTOR - Used to Pre-Set an Odo Factor in the computer to allow indicated distances to be the same as official. When the Chronar is first powered up, all internal counters are zeroed and the Odo Factor is set to 5000. The Odo Factor can be seen by pressing ENTER in the OFF mode. Note -- Whenever the power to the computer is interrupted or turned off, then on -- the Odo Factor will be initialized to 5000.
When the Chronar is initially installed, run through an old rally, down the interstate, or other measured mile using a factor of 5000 and compute a base "statute" factor for your car. Supposing you went 10.00 official miles and your Chronar showed 10.44 miles, then:
                  Official Miles                                10.00
     New Factor = -------------- X Old Factor      New Factor = ----- X 5000 = 4789.272
                  Computer Miles                                10.44
The factor 4789 should be put into the computer. This can be used to start the Odometer Check on a rally. Note that the rounding of 4789.272 to 4789 will cause a 0.01 mile error after driving approximately 176 miles.
D ADD - Used to add distance to the DISTANCE display, and add the COMPUTED TIME for that (added) distance at the speed set in the active SPEED bank. Note -- D ADD only operates when the car is moving or in TEST mode. This works differently from the other functions so read this next section well.
Assume a distance of 00.03 miles is required to be added to the DISTANCE due to wheel lock up. Then:
*In the unlikely event that ENTER is pushed during D ADD, the Nineteen 90 will "remember" and will operate on the first mode that it senses when switching out of D ADD. With 00.00 in the thumb wheels, it will GAIN 00.00 as the switch passes through to OFF. (Going the other way will give you an ODO FACTOR of 0000 and instant PARK).
The display will return to normal with the extra 00.03 miles added and the COMPUTED TIME display (which has been running at double speed) will be corrected with the extra time it takes to go 00.03 miles at the speed set in the active bank.
Set the Mode switch to OFF and the Run/Test switch on the back panel to RUN. Then turn the computer ON with the switch on the back panel. The displays will light up and go through the sequence 9999, 8888, 7777, .... 1111, 0000. This allows a check of all displays for missing segments. Note that if the top bar of a display is missing a 7 will look like a 1 and a 9 will look like a 4. All other possible breaks will look like nonsense.
If the Mode switch is set to D ADD when the computer is turned on, then a second diagnostic routine is initiated. After the display segment check, the TIME OF DAY display will show the number entered in speed bank 1, the COMPUTED TIME display will show the number entered in speed bank 2, and the DISTANCE display will show the number in the Pre-set switches. This enables a check of all the switches. All positions of all switches, when changed, will appear in the readouts. What is set is what the computer reads -- if not correctly displayed, there is a problem. When this diagnostic has been satisfactorily performed, turn the Mode switch to OFF and the power off and on again. The displays will sequence to 0000 and stop. The computer can now be initialized and is ready to rally.
(where you are given a time of passage rather than a speed) should be handled thusly:
Note that extremely slow speeds are sometimes used by Rallymasters, specifically to cause computerized entrants fits. When the leg time is calculated using mileage to the hundredth mile, the Chronar can be too accurate. It will calculate a new computed time approximately 2000 times per mile.
Note -- If possible, it is advisable to leave the displays in HOLD until the control time is verified as being correct. Any mistiming by the control workers can usually be settled immediately provided that the computer is still in HOLD.
When the timing is from checkpoint timing line to timing line, the following procedure will ensure accuracy:
When timing is from the out marker of one checkpoint to the timing line of the next, the following procedure can be used:
All items are warranteed for two years from date of purchase to the original owner (all parts and labor included) with the exception of displays which are warranteed for 90 days. The customer should return the defective item to us (shipping pre-paid and insured for the full value) with a detailed description of the problem. The repaired unit will be returned with shipping charges C.O.D. unless other prior arrangements are made.
Impulse units will only be warranteed if not physically damaged, as are all items.
Non-authorized modification, incorrect installation, repairs by non-authorized personnel, or physical abuse will void the warranty.
Non-warranty repairs:
Same procedure as above except repair charges will be included in the C.O.D. amount. A quote will be issued if requested or if the cost of repairs will exceed $60. Cable impulse unit repairs will be a flat rate of $25.00; magnetic impulse units are not repairable.
Typical repair time is less than 3 weeks plus shipping time; very rush orders can be handled at premium prices if they are previously negotiated and humanly possible.